Documentation Index
This page will grow to include detailed documentation for WeedTracker features. Below is a placeholder index of topics.
- Getting Started
- Adding and Managing Inventory
- Searching and Sorting
- Viewing Your Usage History
- Viewing Your Usage Chart
- Customizing Tier Levels and Types
- Exporting and Importing Data
- iCloud Sync and Multi-Device Use
- Clearing Your Data
- App Settings
- FAQ and Troubleshooting
Getting Started
Welcome to WeedTracker! This guide will walk you through the basics of setting up your inventory. As you add, adjust, or remove items, the app automatically builds a complete history of your usage — no extra steps required.
1. Add Your First Strain
Tap the + button to add a new item to your inventory. You can give it a name (e.g., “Blue Dream”), and enter the cost and quantity. Optionally, you can assign a tier (like “Premium” or “Budget”), select a type (e.g., Flower, Concentrate, Edible), and even attach an image for quick visual reference.
2. Customize Tier Levels And Types (Optional)
WeedTracker lets you define your own tiers and item types to match the categories used by your local dispensaries. These can be managed from the Settings screen, and any changes will apply automatically across your inventory.
3. Inventory Adjustments Are Automatically Tracked
Whenever you create a new strain, restock an item, use something from your inventory, or delete a strain entirely, WeedTracker automatically logs the change as a transaction. These transaction records form your usage history — no need to manually log anything.
You can view each transaction's details, including the date, amount changed, new totals, and any notes you added. This helps you keep an accurate history of your habits and inventory movement over time. You can access your usage history from the App main menu.
4. View Usage History
Choose View History from the main menu to see a log of all your automatically recorded transactions. You can filter the list by transaction type, date range, or keyword match across strain names and notes, making it easy to find what you're looking for.
The history view gives you a clear, scrollable record of all changes to your inventory, including the date, action taken, quantity adjusted, and any notes entered at the time.
5. Visualize Your Usage History With The Usage Chart
To view your usage history chart, select View Chart from the main menu.
WeedTracker includes a built-in bar chart that gives you a quick, visual snapshot of how your inventory is changing over time.
The chart shows totals for new items added, stock increases, stock used, deleted strains, and overall increases or decreases — all based on your current date filter. Each bar is color-coded and labeled for easy comparison, and the exact quantity values are shown right on the chart.
This view is perfect for spotting trends at a glance, without scrolling through your full transaction history. It’s a great way to stay aware of your habits and see how your usage adds up over time.
6. Set Low Stock Warnings
You can set a low stock warning threshold from the App Options screen, available in the main menu. Once enabled, WeedTracker will alert you when your total inventory level drops below that quantity. (You will receive a pop up warning, and the total grams will be shown in red.)
This helps you stay on top of your supply without the need to constantly check levels manually — a simple way to avoid running out unexpectedly.
7. iCloud Sync & Backups
Your data is stored privately on your device and can sync across all your Apple devices using iCloud (if enabled). You can also export your data as text or CSV files and import it later, ensuring you always have access to your records.
See the screen shots below for an overview of the main inventory functionality.
Inventory View (iPhone)
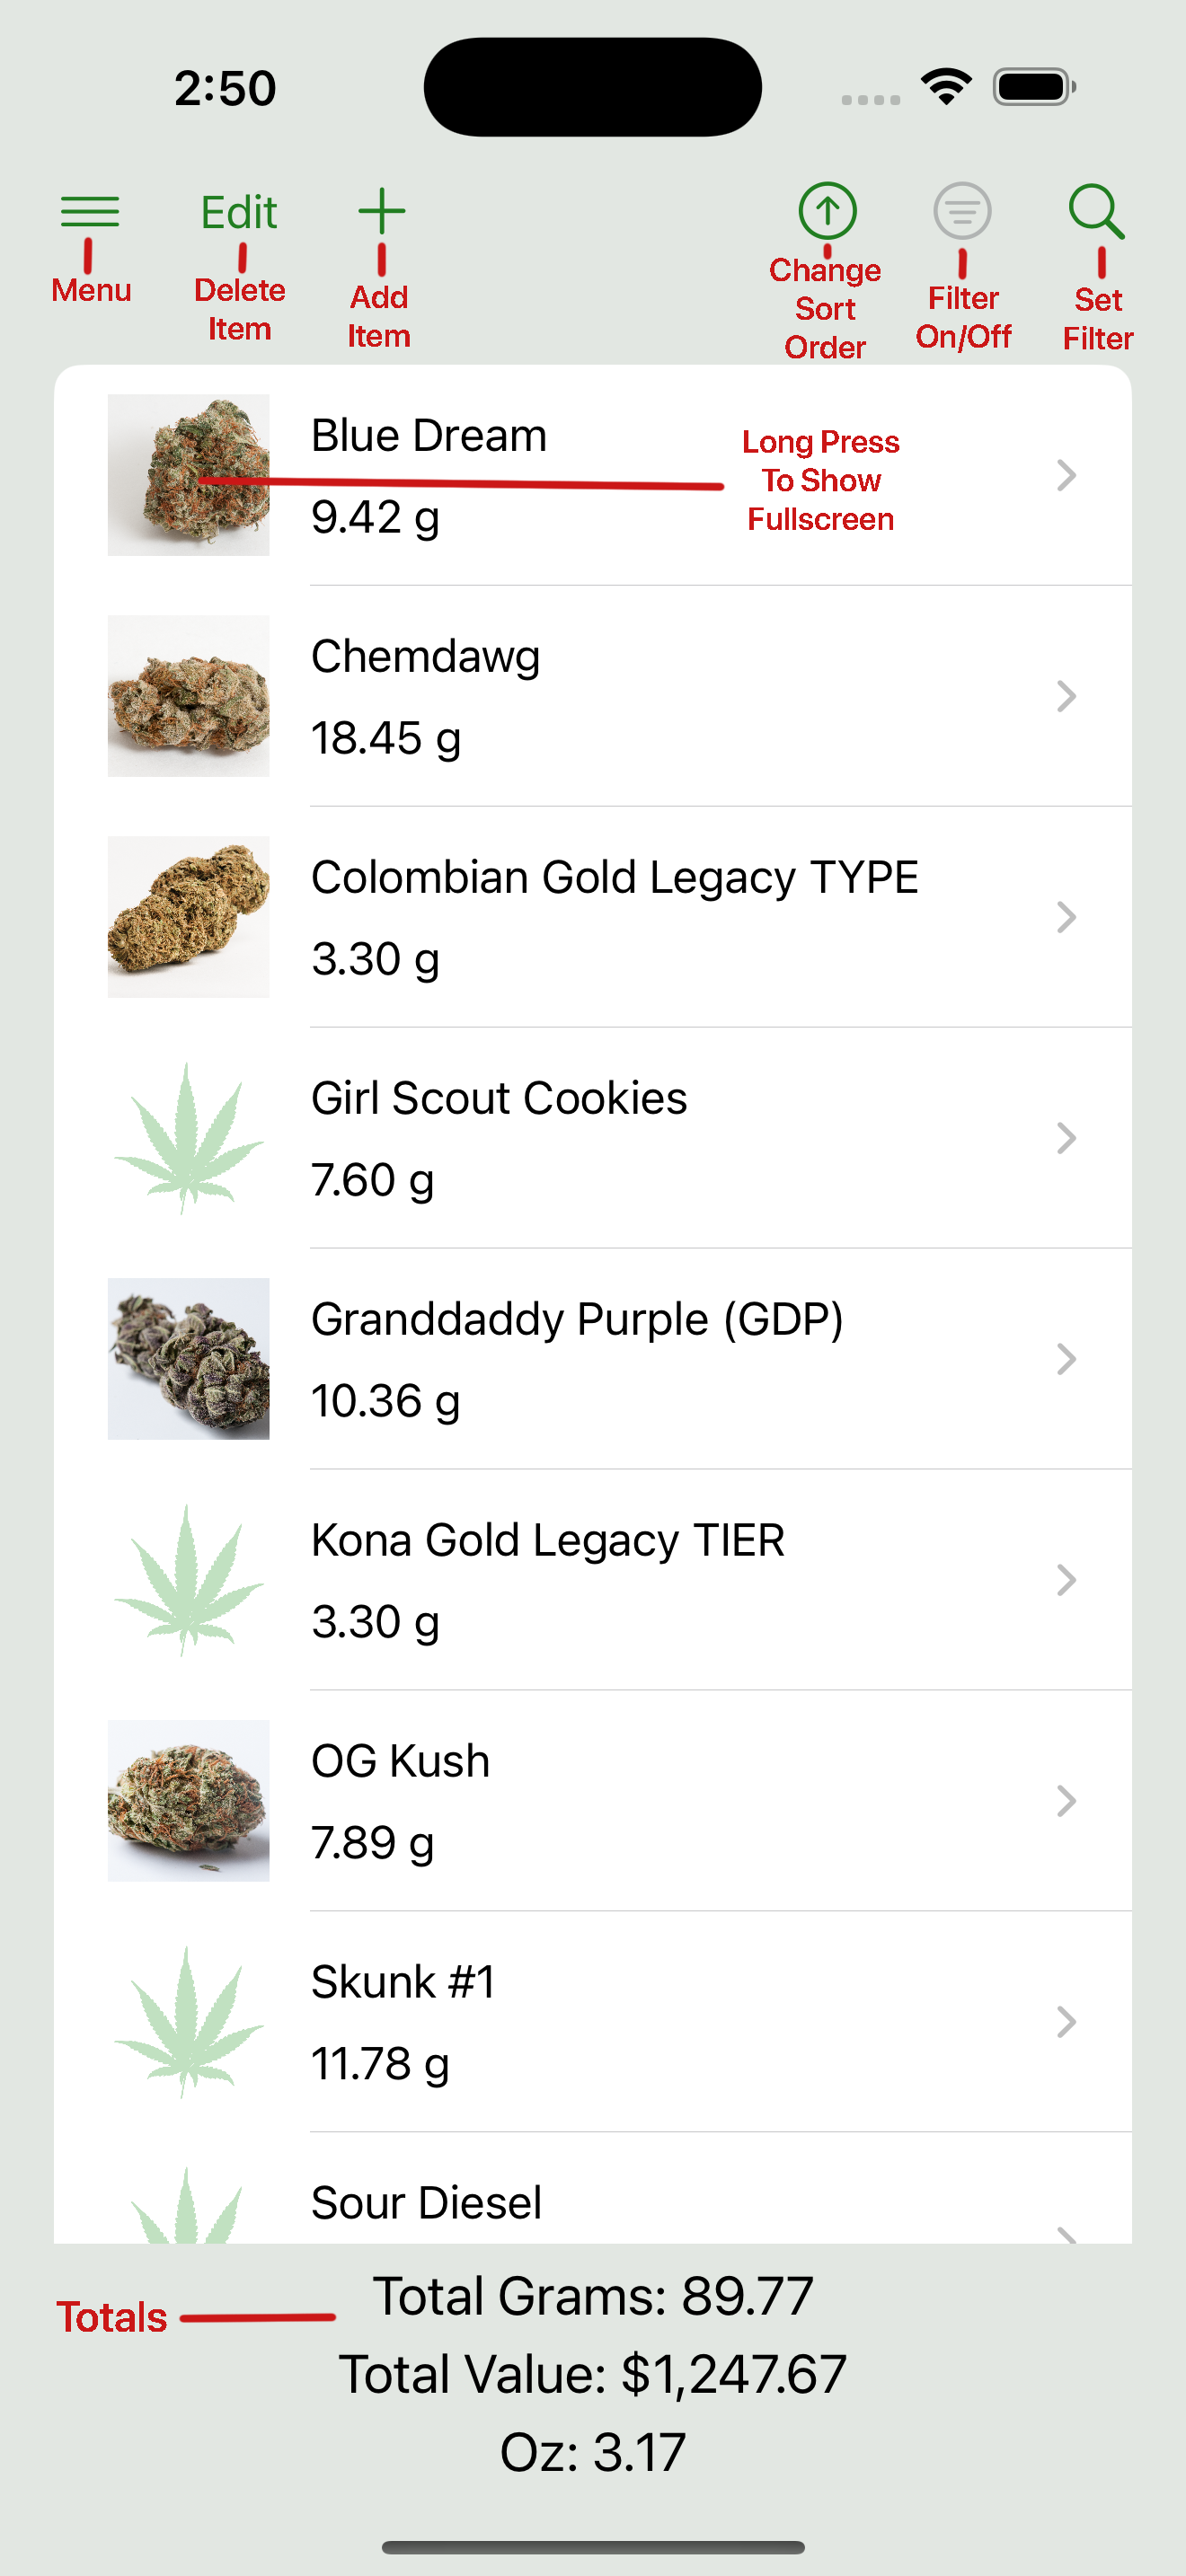
On iPhone, the main inventory screen shows your strains in a single-column list. Tap the + button in the top-right to add a new item.
Inventory View (iPad)

On iPad, the main view uses a two-column layout: the list appears on the left, and the selected item’s details appear on the right.
8. Sample Data
Want to explore the app with sample data?
You can load sample inventory and history records in two ways:
- From the initial startup screen
- Or later via Menu → Create Sample Data
This is a great way to try out the app’s features before entering your own data.
When you're ready, you can remove sample data — or all data — by visiting the Clearing Your Data section.
Adding and Managing Inventory
To add a new item to your inventory, tap the + button. A form will appear where you can enter details like the strain name, quantity, cost, product type (such as Flower or Concentrate), and tier (e.g., Premium, Budget). You can also attach an image if you’d like a quick visual reference.
To update an existing item, simply select it from the list. From the detail view, you can:
- Tap Add to increase the quantity
- Tap Remove to decrease it (e.g., for usage or disposal)
To delete an item, either:
- Tap the Edit button in the list view to reveal delete options, or
- Swipe the item to the left and tap Delete — this uses standard iOS swipe-to-delete behavior
Each of these actions automatically creates a transaction history entry, so your usage is always tracked in the background.
All changes are saved automatically — there’s no need to press a Save button.
When adding or removing stock in common increments, you may use the built-in fraction picker to quickly select standard ounce-based amounts like 1/8, 1/4, or 1 oz. WeedTracker will automatically convert these to grams.
Fraction Picker
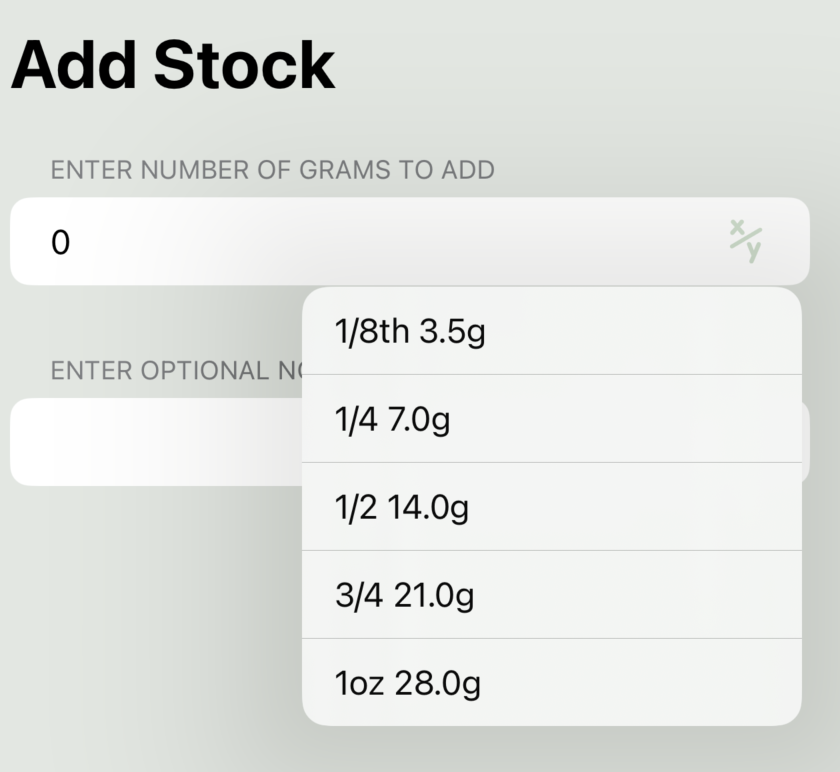
Use this menu to quickly add or remove common increments like 1/8, 1/4, or 1 ounce.
List Edit Mode
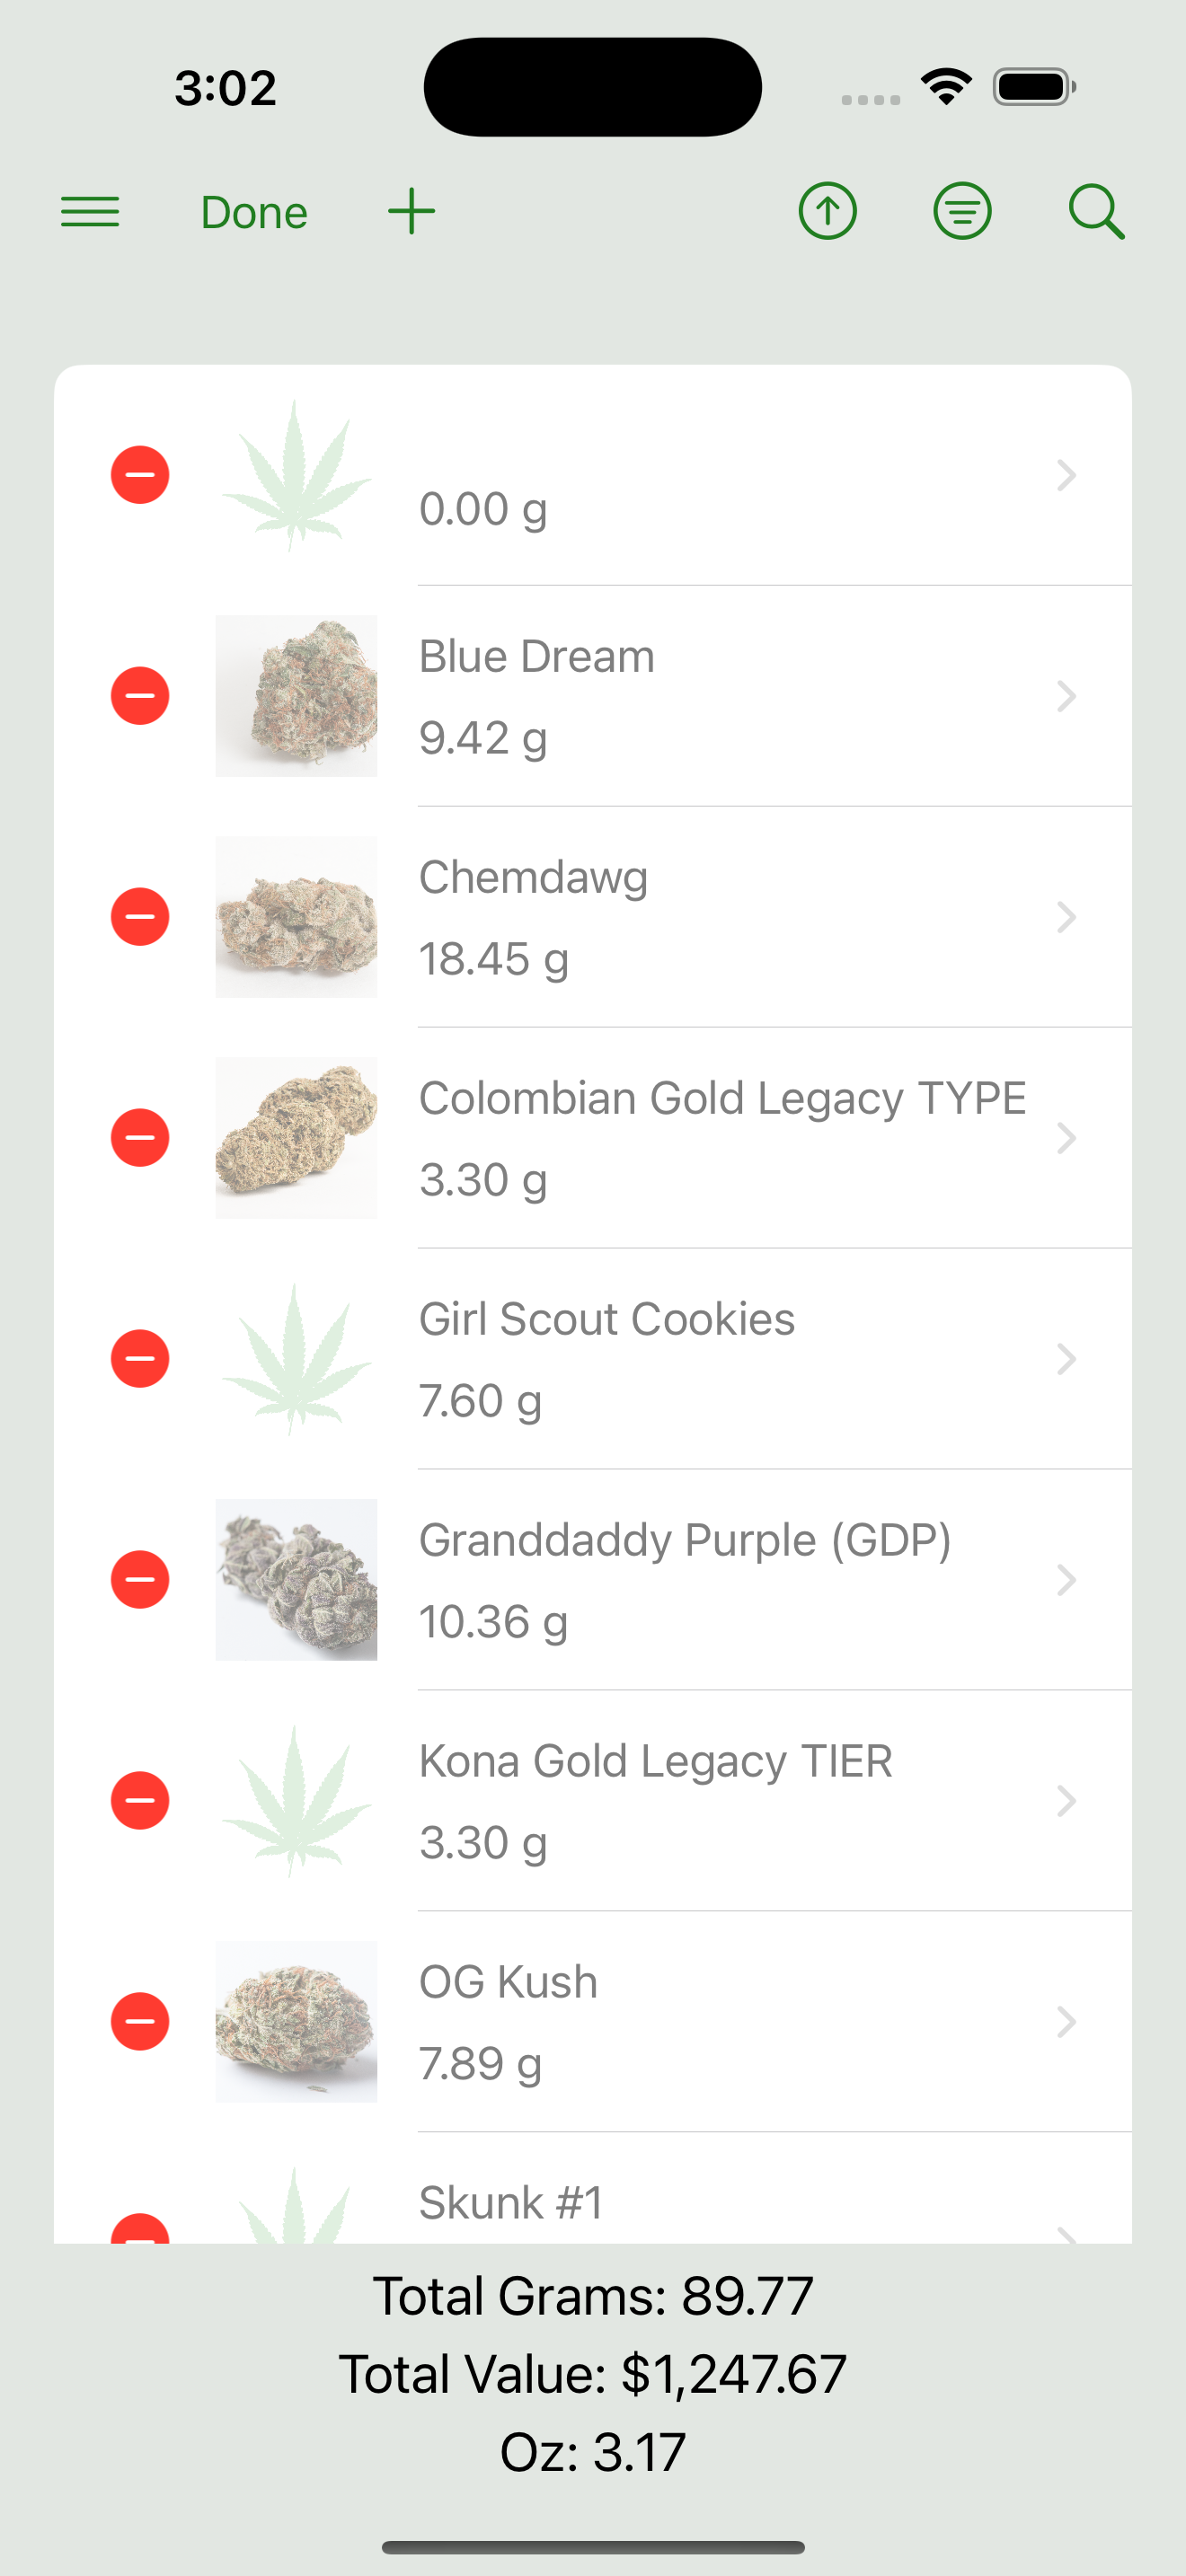
Tapping the Edit button reveals delete controls for each item. You can also swipe an item to delete it using standard iOS gestures.
Searching and Sorting
WeedTracker includes flexible filtering and sorting tools to help you quickly find what you need. These tools work consistently across the app, though the available filter options vary depending on the view.
You can filter your data by a variety of fields — such as name, quantity, type, tier, cost, or rating — depending on the context. For numeric fields like quantity and cost, you can choose a comparison (greater than, less than, equal to) to help narrow results. For tier and type fields, you can select multiple values using the “Add” button.
You can also enter freeform text to search by name or notes, and filter by date range (in the View History and Export History views).
Once filters are applied, only matching results will be shown. You’ll also see a compact summary of the filters currently in effect. You can temporarily hide or show the filtered list using a toggle, or clear all filters at once to reset the view.
Sorting lets you reorder the results by name. You can toggle ascending or descending order with a tap.
These tools are available in the following places:
- Inventory view – filter and sort your current items
- View History – filter and sort past transactions
- Export History – filter and sort which transactions to export
- Export Inventory – always exports your full inventory; filtering and sorting are not applicable
Inventory Filters Panel
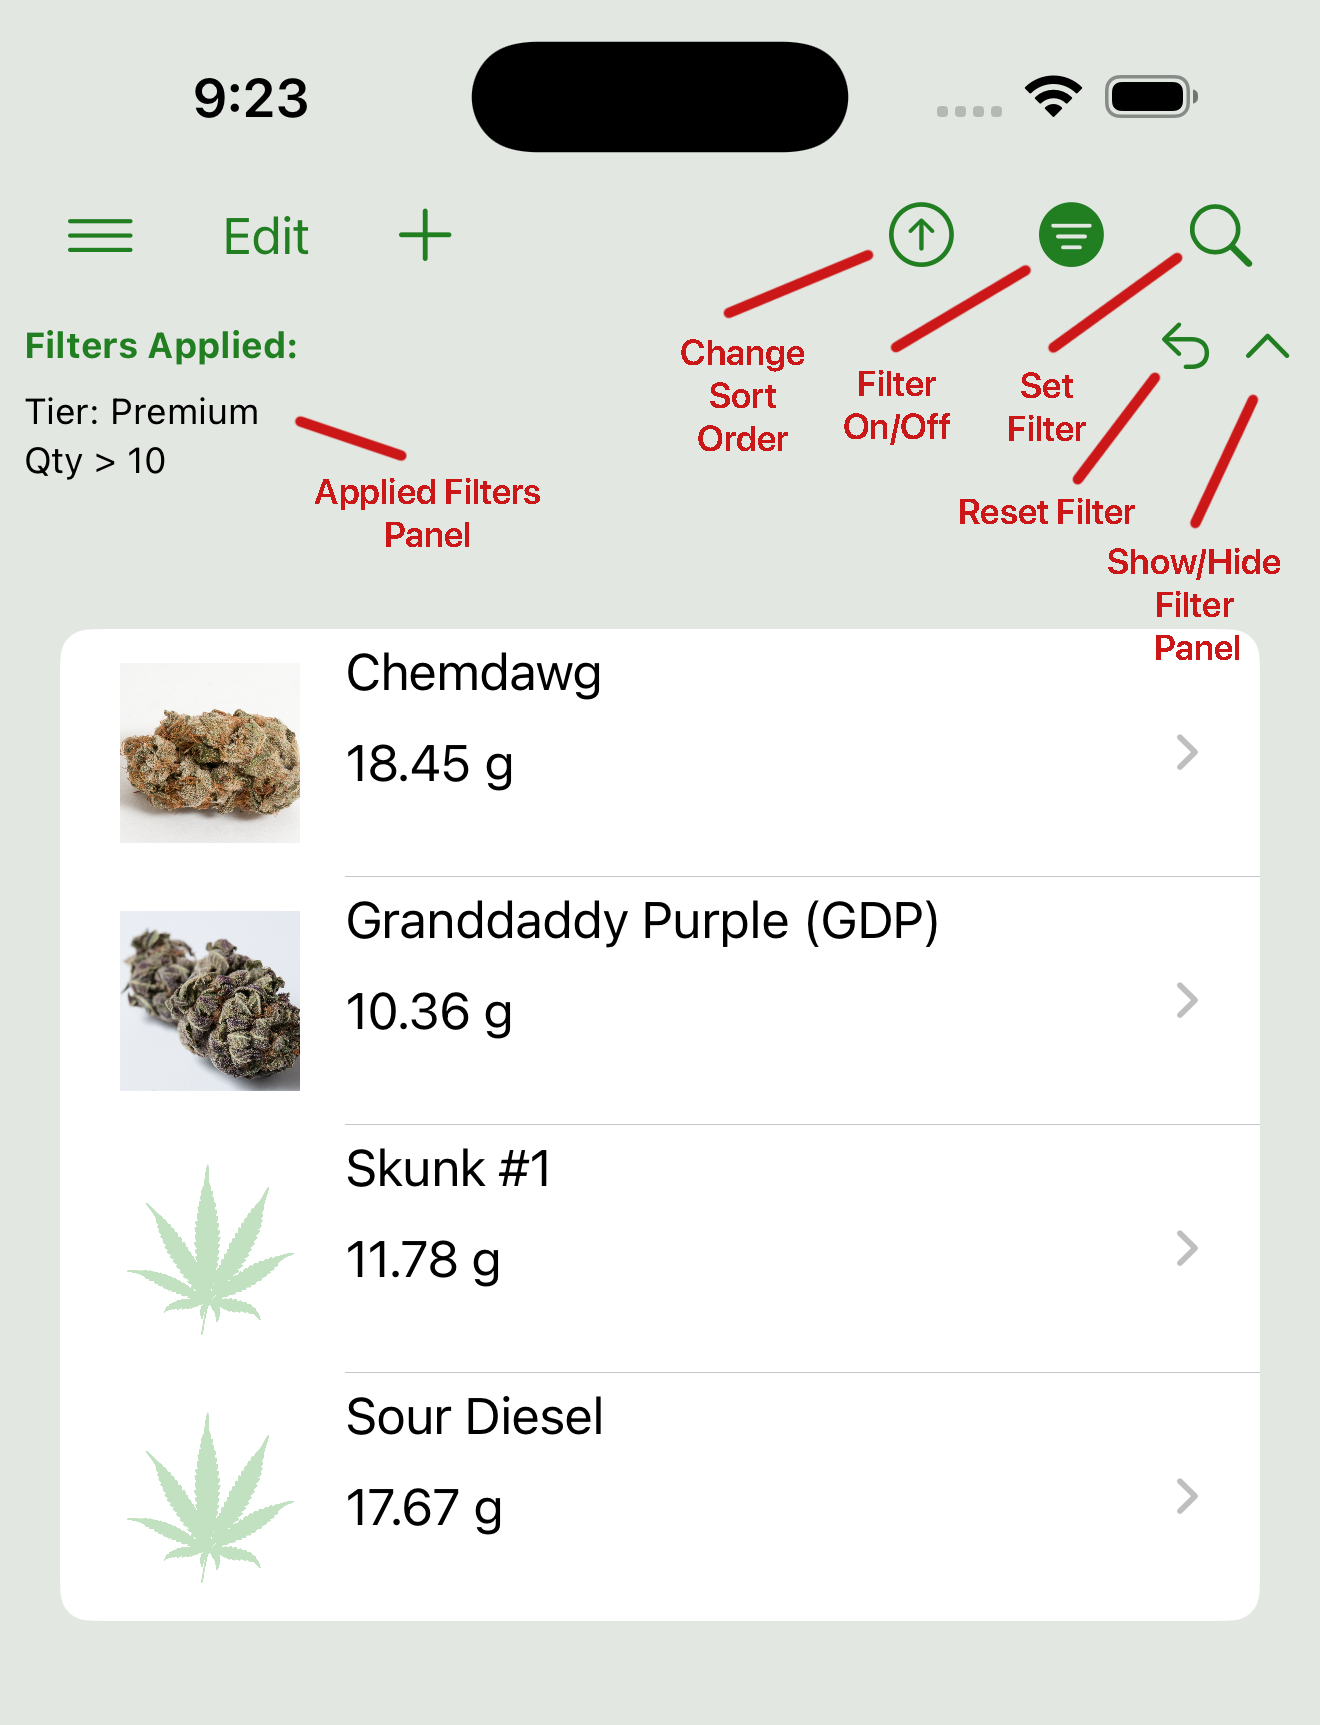
Use the filter panel to search, apply filters, or sort inventory items alphabetically by name.
Choose Comparison Operator

When filtering by a numeric value such as cost or quantity, tap to choose a comparison operator: greater than, less than, or equal to.
Add Tier Picker
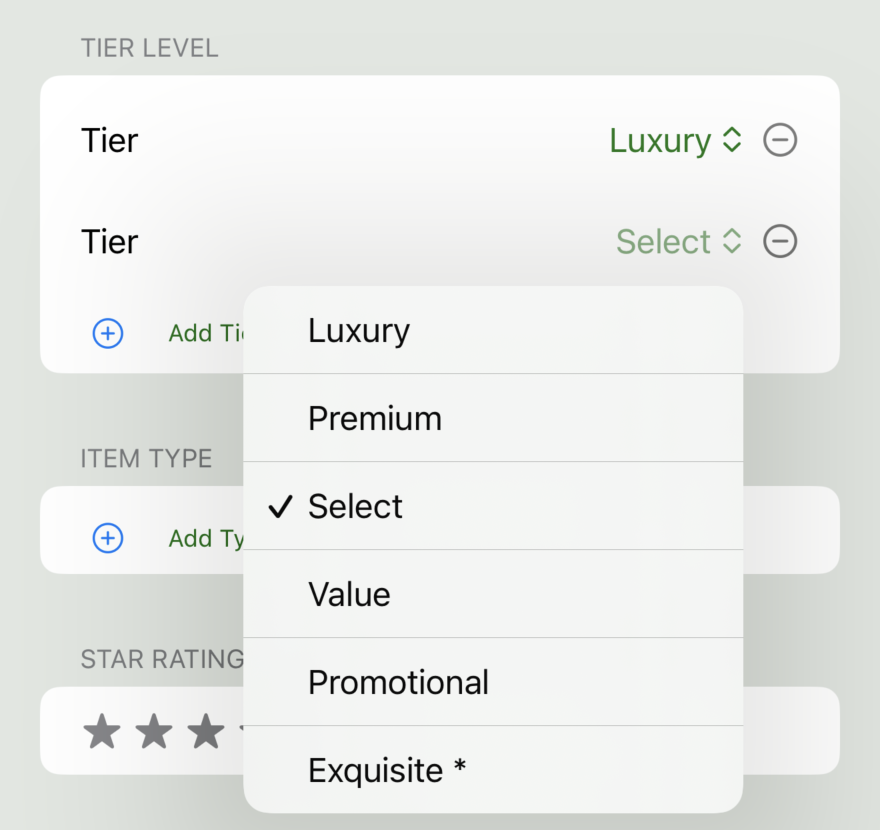
Tap the “Add” button to select a tier or type from your defined options. You can add multiple filters in each category.
Viewing Your Usage History
To view your usage history, select View History from the main menu.
You can apply all the usual filters — by strain, date range, transaction type, or text match — to narrow down the list of past transactions. You can also sort the results by date, ascending or descending.
At the bottom of the list, you'll see a summary of totals based on the currently filtered record set. These include:
- New: total quantity added by new items
- Added: stock increases to existing items
- Removed: consumption or usage
- Deleted: items removed from inventory
- Net Change: the overall difference in inventory over the selected period
For example, you might see that you purchased a total of 30 grams and used 24 grams over a month, resulting in a +6g net change.
View History Screen
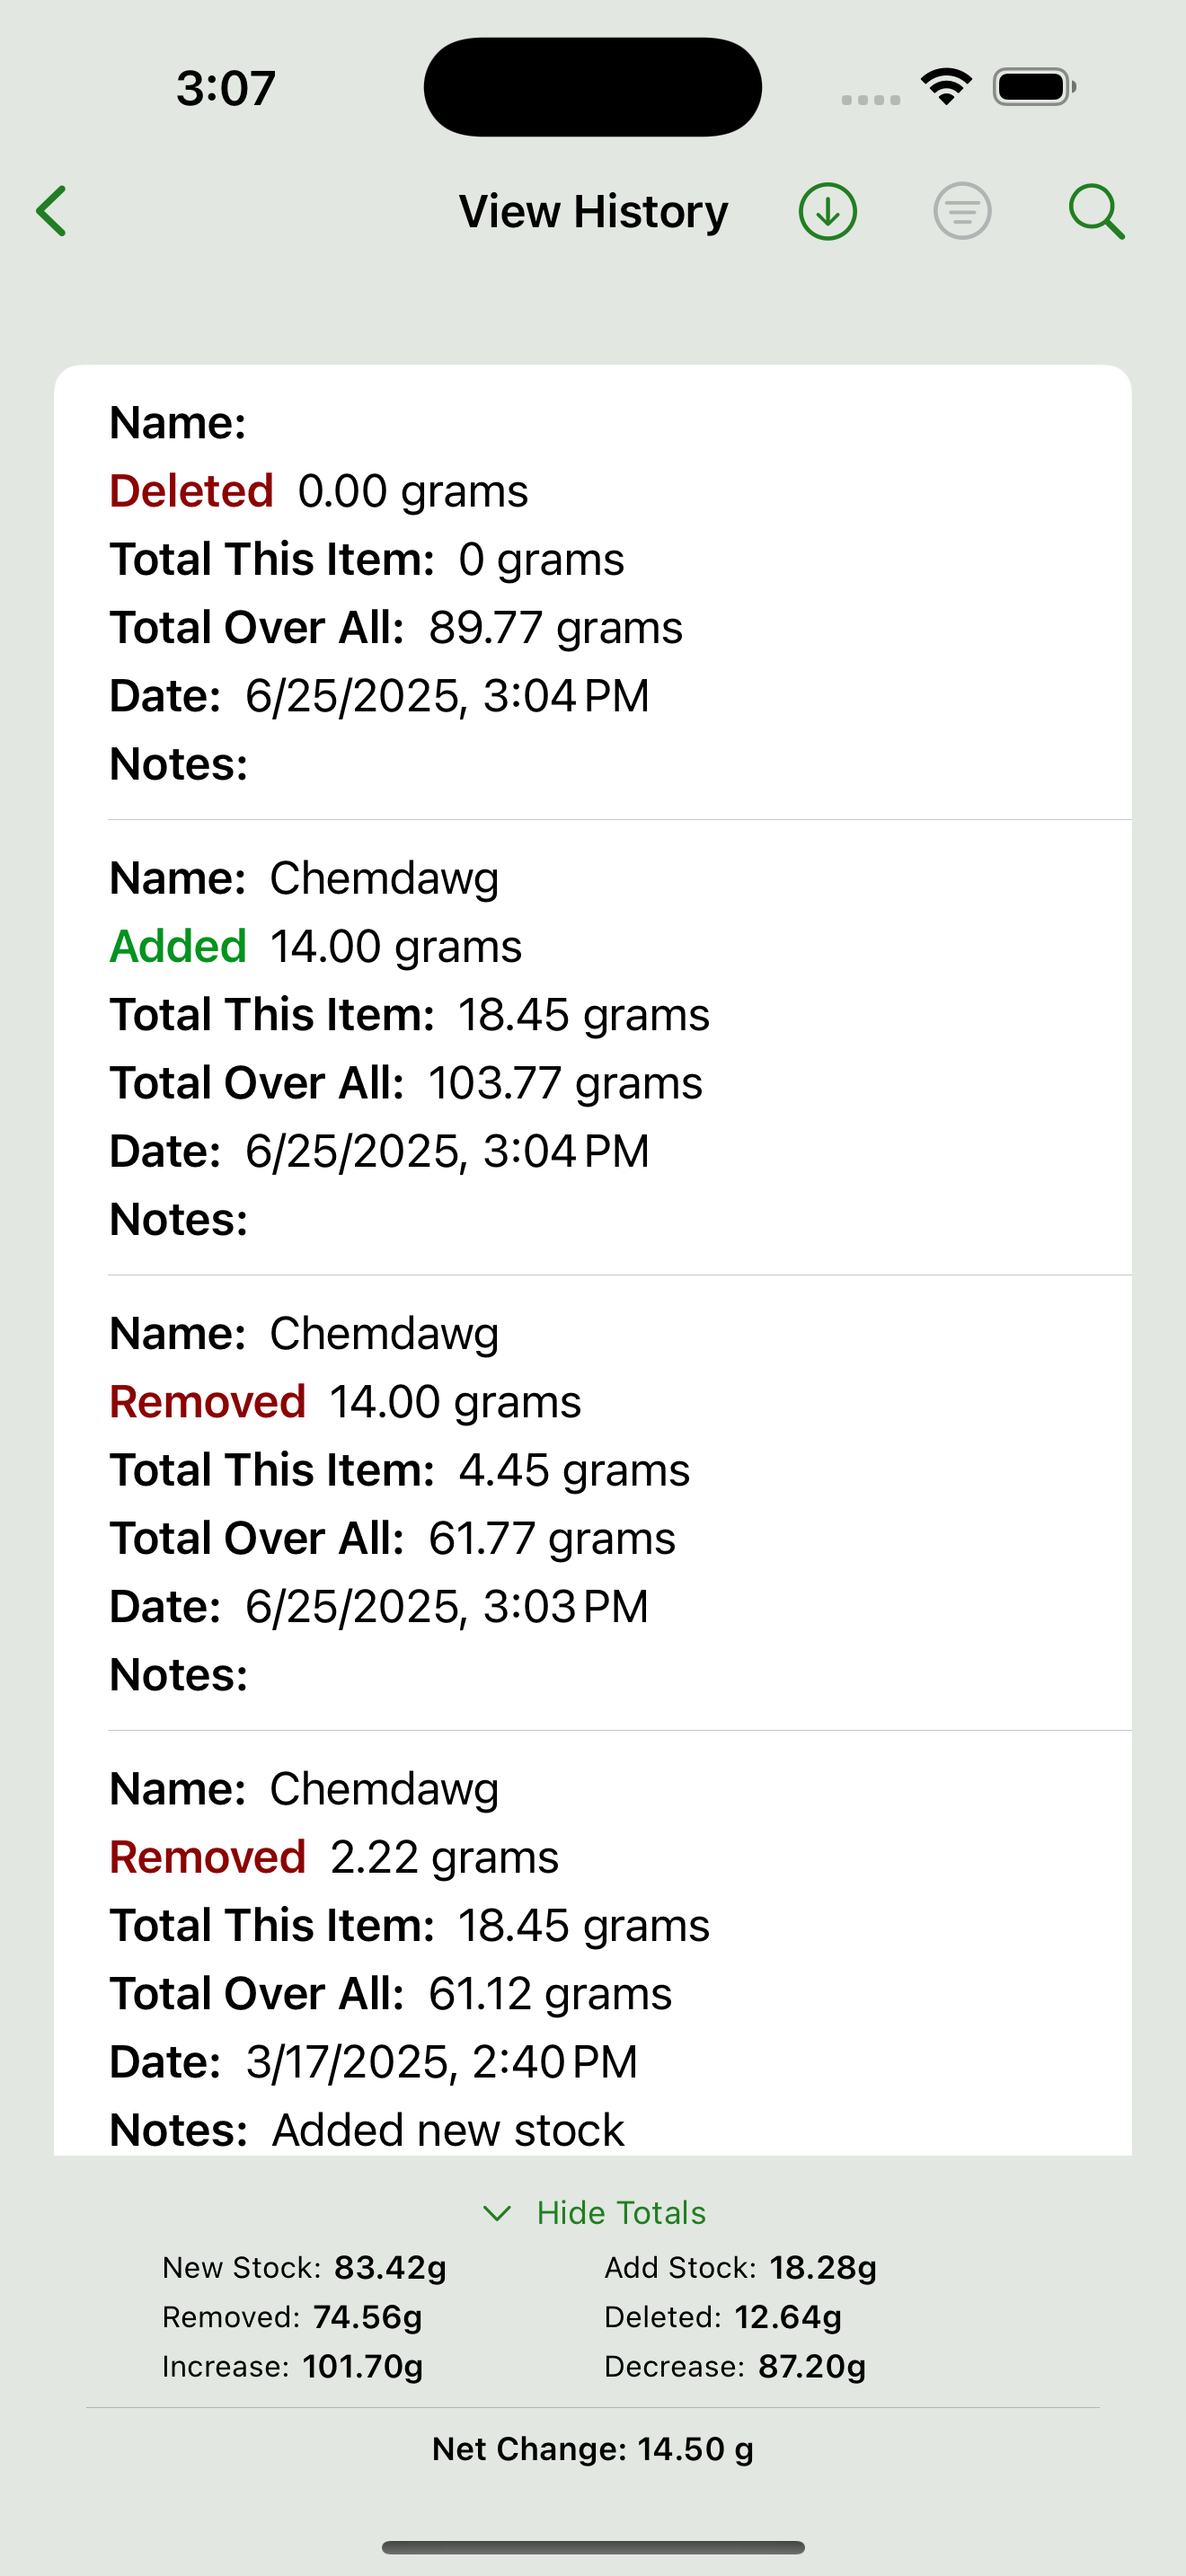
The View History screen shows your transaction history with filters, sorting, and a summary of totals at the bottom.
Interactive Usage Summary Chart
To view your usage history chart, select View Chart from the main menu.
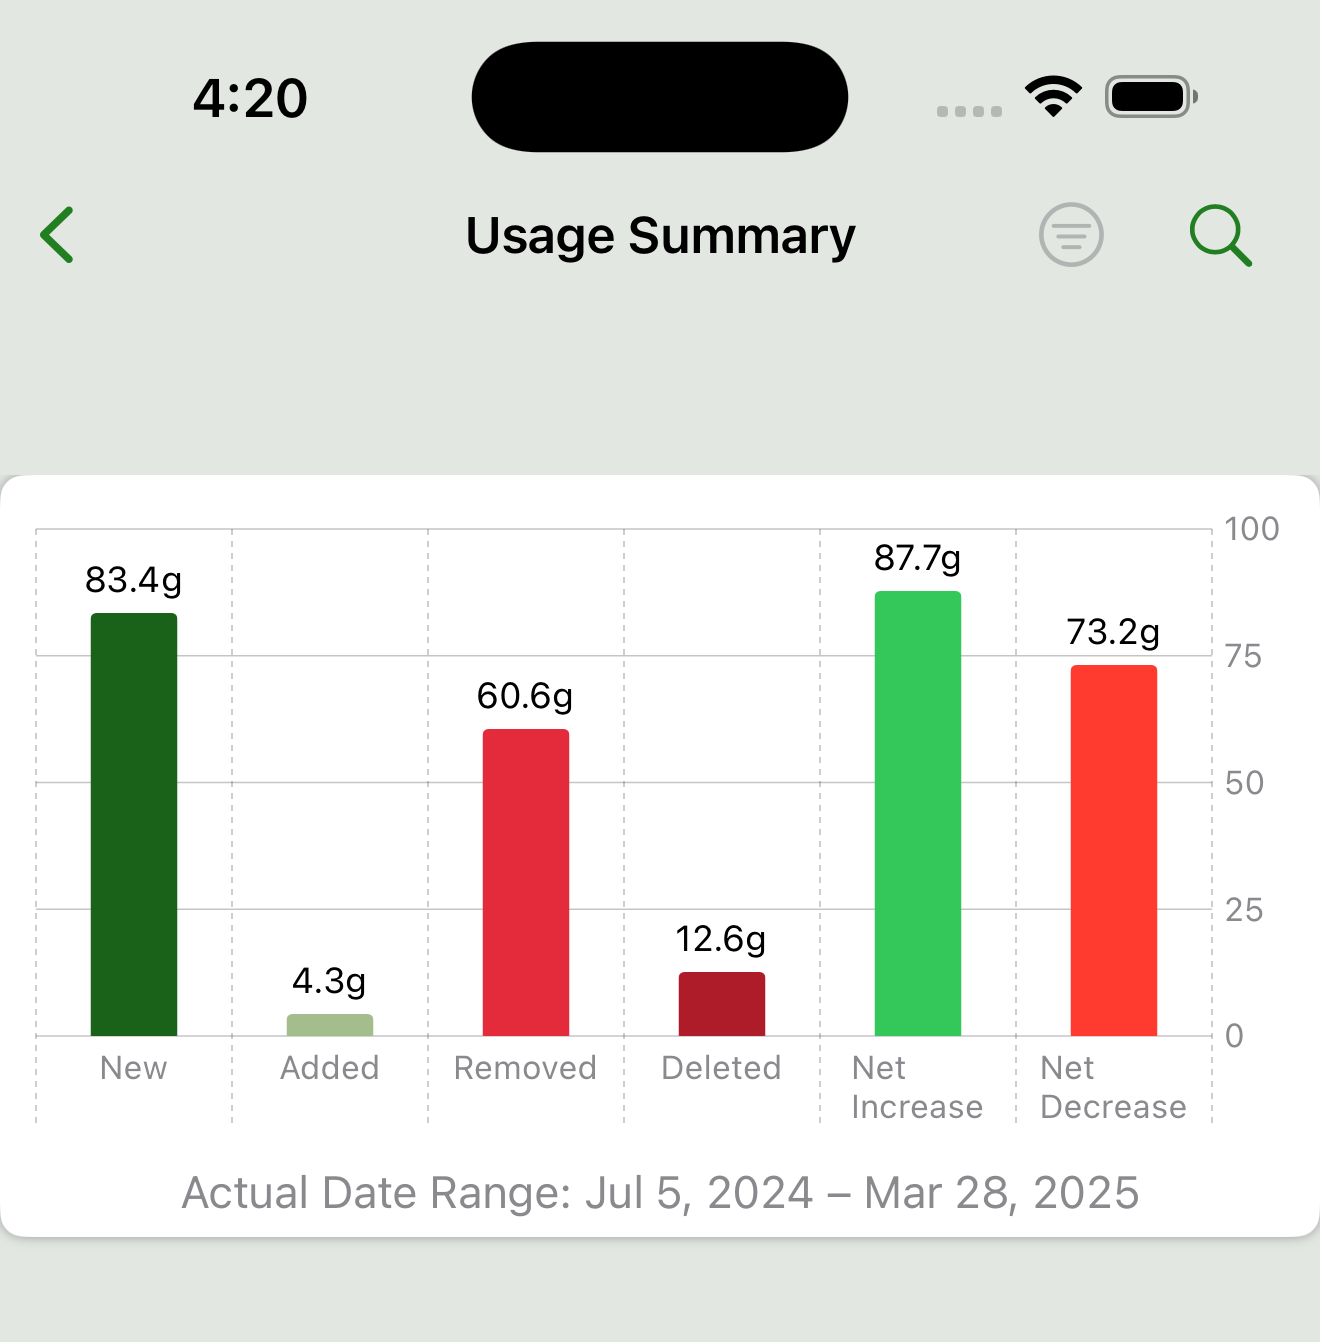
The Usage Summary Chart provides a quick visual snapshot of your tracked inventory activity over a selected date range.
- Six Distinct Bars
Displays: New stock added, volume added, volume removed, deleted items, total net increase, and net decrease. Each bar is clearly labeled and color-coded based on common color standards. - Live Data Filtering
Apply a date range to narrow the view—only transactions within that interval will be reflected. Use the filter panel (tap the filter icon in the nav bar) to choose start/end dates. Clear the filter to show all history again. - Interactive Value Annotations
Each bar shows its exact quantity value above it in grams for ease of reading. - Actual Date Range Displayed
Under the chart, the app shows the real transaction range (earliest to latest) that the chart reflects, ensuring full transparency about the timeframe covered.
What the Chart Provides
Quickly see what’s been added, removed, or deleted over time — plus the overall increase/decrease. The chart gives you a high-level view of your inventory activity without needing to dig through individual records.
It’s designed to complement the detailed transaction history table by helping you spot trends and totals at a glance.
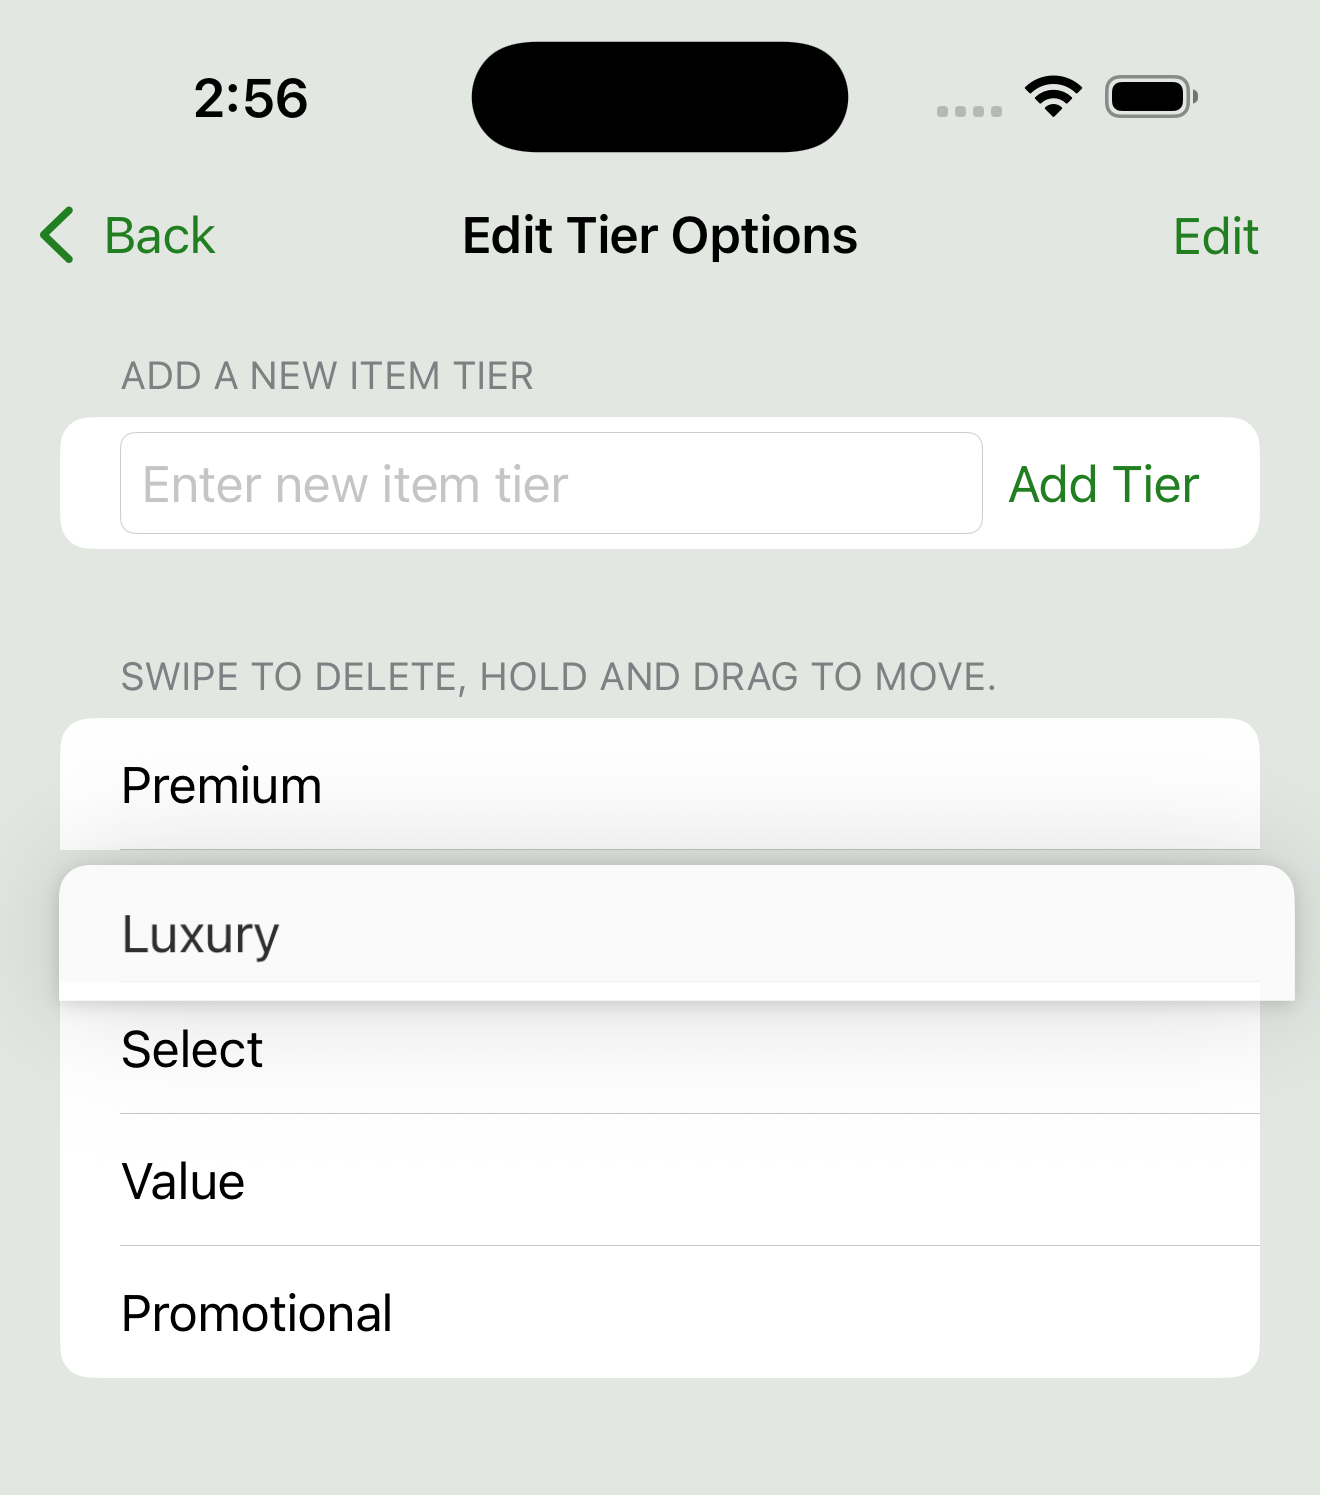
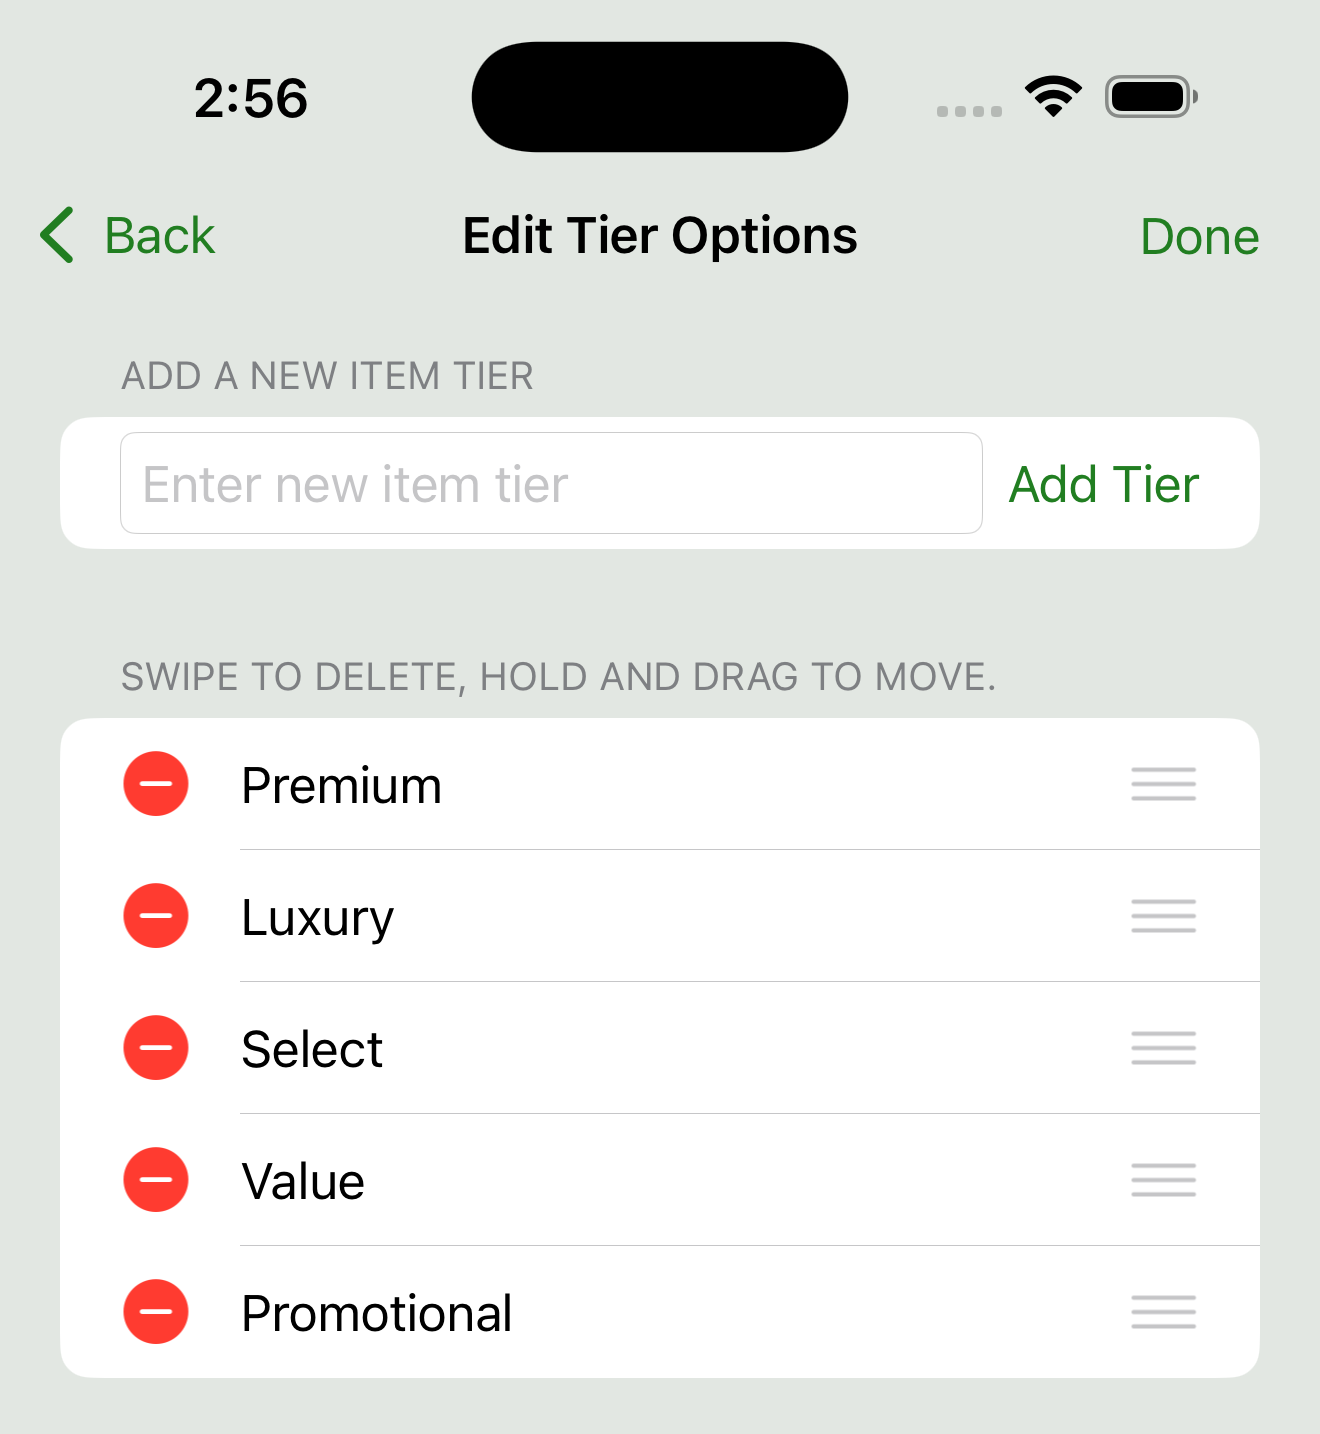
Customizing Tier Levels and Item Types
Access this feature from Menu → Settings → Edit Types or Edit Tiers.
You can personalize your inventory categories by adding, removing, or reordering tiers and types to suit your needs.
- Add a new entry: Type it in the text box and tap Add.
- Remove an entry: Swipe left, or tap Edit to delete or reorder.
- Reorder: Press and drag to change the order — this is reflected in pickers throughout the app.
What Happens to Old Entries?
If you've already assigned a type or tier to an item and later remove or rename it here, don’t worry — the app keeps track.
- It will automatically include any legacy values still in use by inventory items, even if they’re no longer in your custom list.
- These older values will appear in pickers with an asterisk ( * ) to indicate they're still in use but not part of the current list.
This ensures all your existing records remain visible and usable without any data loss.
Exporting and Importing Data
Access import and export options through the Menu → Import/Export section.
WeedTracker lets you back up and transfer both your inventory and history data. You can:
- Export data in either CSV or tabular text format
- Export inventory images by enabling the image switch on the export screen
- Import data from compatible CSV or tabular text files
Where Exported Files Go
When exporting, the app creates a date- and time-stamped folder inside the WeedTracker folder in your device’s Documents directory.
This folder contains:
- Your exported text or CSV file
- Inventory images, if the option was enabled
Filtering Before Export
You can apply filters (by date, strain, type, etc.) and sort records before exporting. This is useful if, for example, you only want to export history from a specific date range.
Importing Files
- Text files can be imported from anywhere on your device.
- Image files must be located inside the app’s
WeedTrackerfolder, due to Apple’s file access limitations.
This allows for complete backup and restore of your inventory and history data.
When importing, you’ll be prompted to select a file using the standard iOS file picker.

iCloud Sync and Multi-Device Use
WeedTracker supports syncing your data securely across multiple iPhones and iPads using iCloud. This allows you to:
- Keep your inventory and history in sync across all devices
- Make updates on one device and see them reflected on another
- Seamlessly switch between devices without losing your data
How It Works
WeedTracker uses Apple’s CloudKit service to store your data in your private iCloud account. Syncing happens automatically in the background when:
- iCloud is enabled for the app
- All devices are signed in to the same Apple ID
- The app is installed and iCloud permissions are granted on each device
How to Enable iCloud Sync on Your Device
- Open the Settings app on your device.
- Tap your Apple ID at the top (your name).
- Tap iCloud.
- Scroll down and tap Show All under “Apps Using iCloud.”
- Ensure WeedTracker is turned on in the list.
Tip: Repeat this check on each device where you use WeedTracker.
Notes
- WeedTracker does not require iCloud Drive — just basic iCloud support for apps.
- Make sure you're connected to the internet for sync to occur.
- Changes may take a few moments to sync, depending on network and device activity.
Clearing Your Data
You can remove sample data — or any data you've entered — at any time.
Go to Menu → Settings → Clear Database to:
- Delete your Inventory records
- Delete your Transaction history
- Or both at once
⚠️ This action is permanent and cannot be undone.
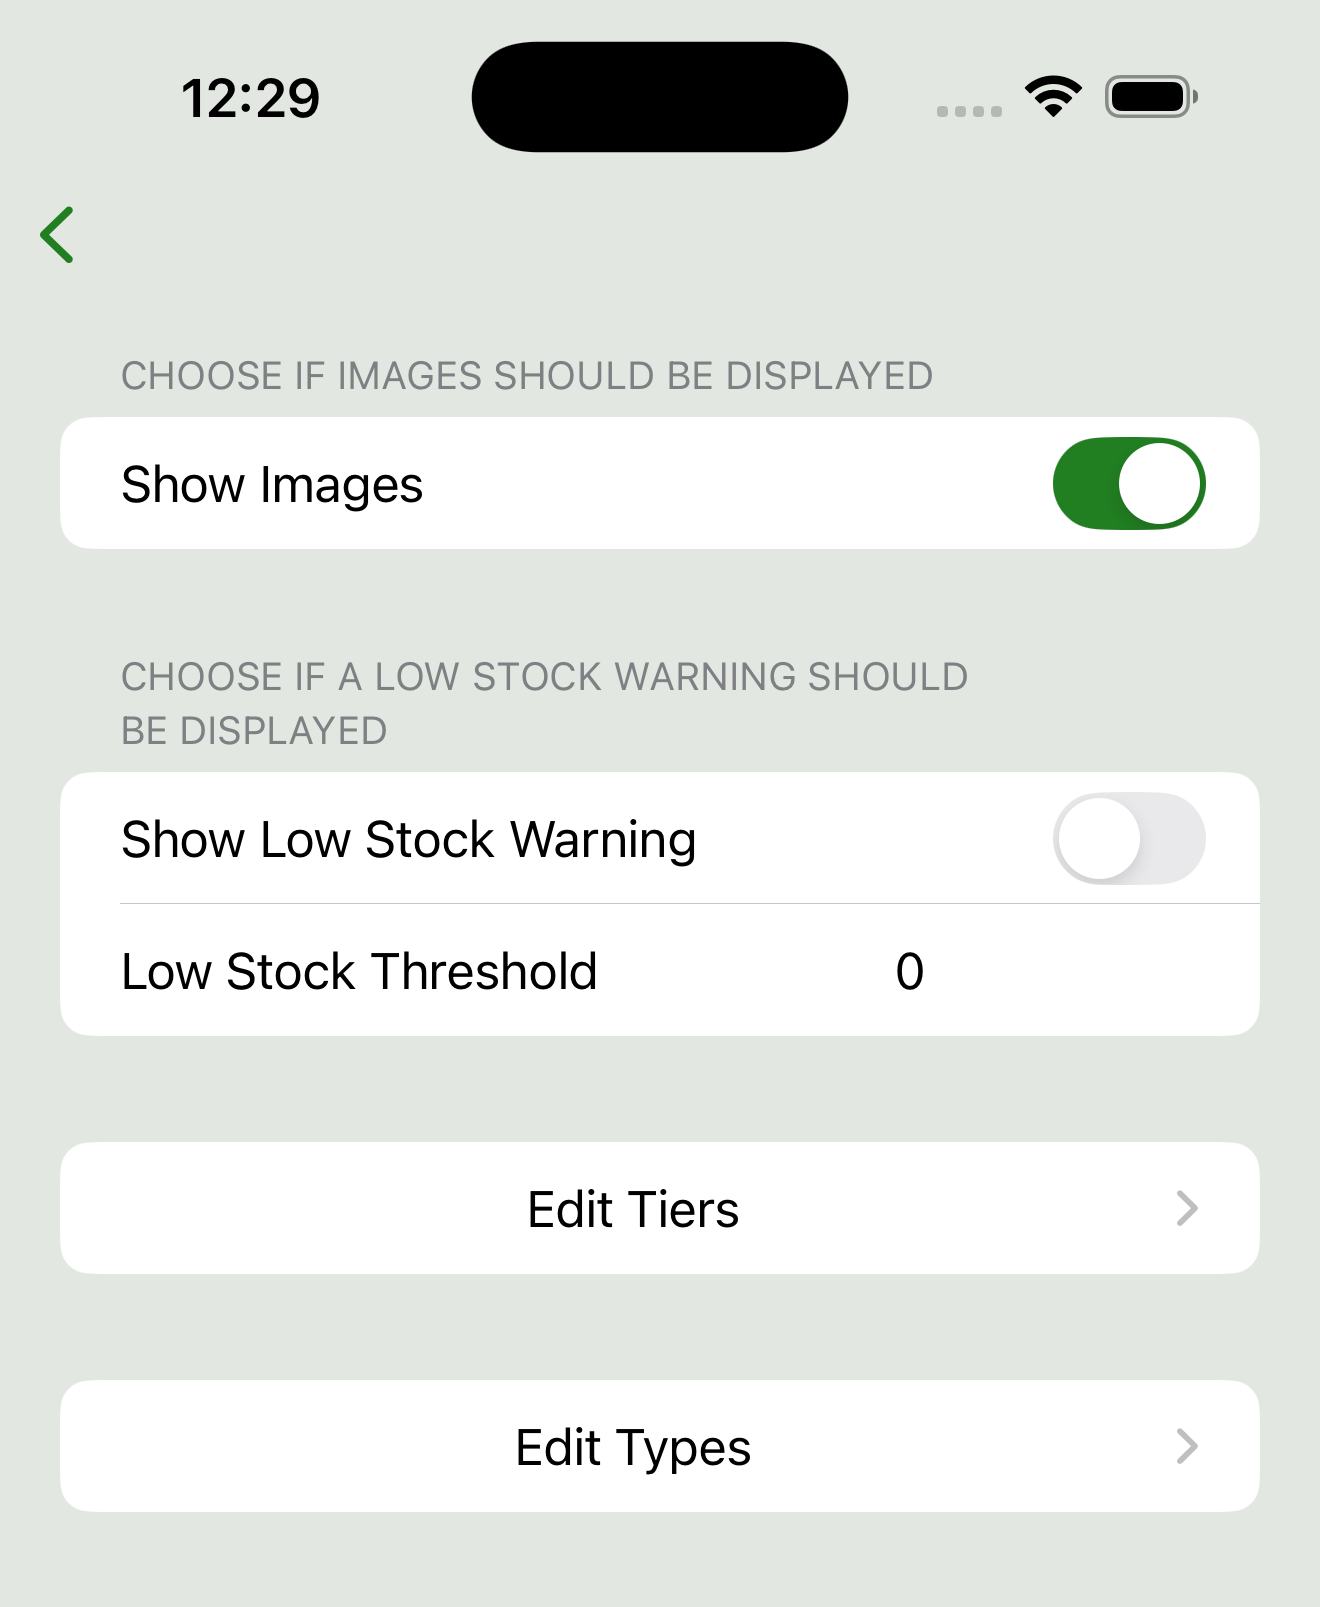
App Settings
You can customize key app behavior from the Menu → Settings screen:
-
Show Images (On by default)
Toggle this on or off to display inventory images in list views. Turning it off results in a cleaner, faster layout — especially useful on smaller screens or for a more text-focused display. -
Low Stock Warning (Off by default)
Enable this to highlight inventory items that fall below a custom threshold. You can:- Toggle the warning on or off
- Set the low-stock threshold (e.g., 3.5 grams)
-
Edit Tiers and Types
Provides quick access to manage your inventory categories:- Tap Edit Tiers or Edit Types to add, remove, or reorder labels
- These values appear in filter pickers and item detail views
All settings take effect immediately and are saved automatically.
FAQ and Troubleshooting
[Coming Soon]